Setting Up a Matterport Camera: A Step-by-Step Guide
Setting Up a Matterport Camera: A Step-by-Step Guide

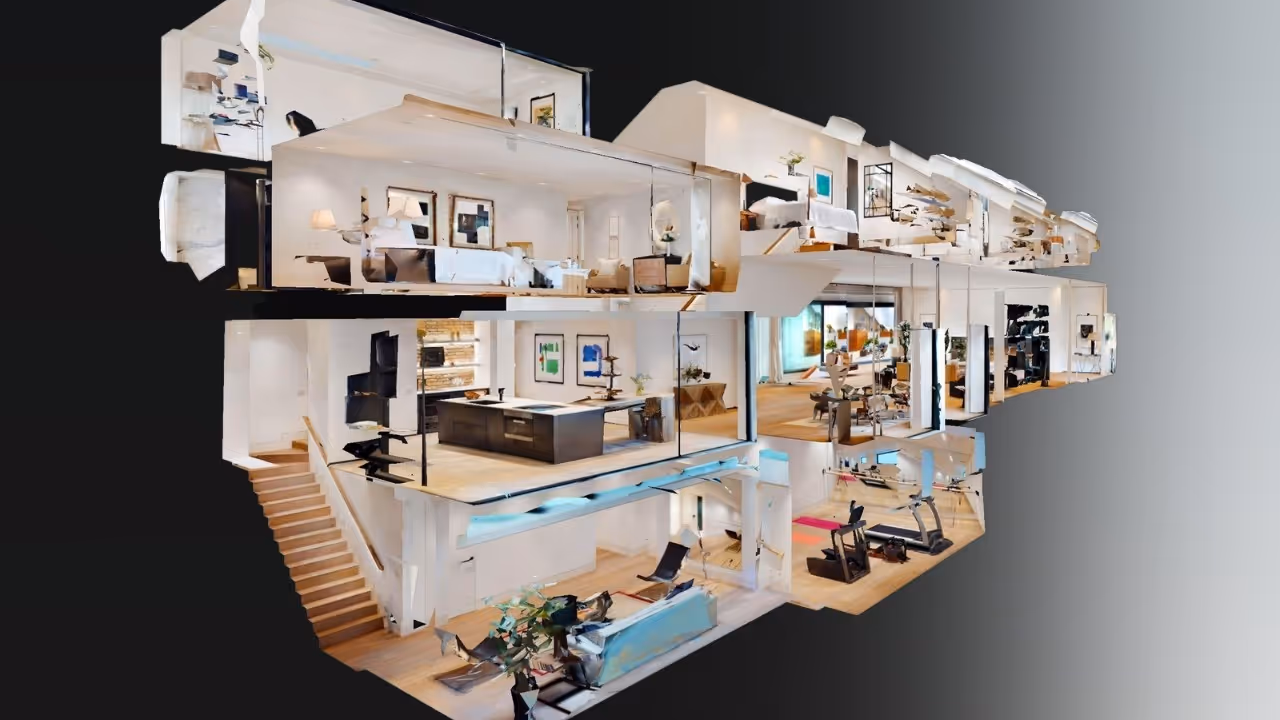
Matterport cameras have revolutionized the way we capture and experience spaces, creating immersive 3D virtual tours that are invaluable for industries ranging from real estate and AEC (Architecture, Engineering, and Construction) to insurance and facility management. While Data Capture Service utilizes advanced equipment like the Matterport Pro 3 for professional results, understanding the basic setup can be helpful. This guide provides a general step-by-step approach to setting up a Matterport camera.
Before You Begin: Essential Preparations 📋
Proper preparation is key to a smooth scanning session and high-quality results.
- Charge Everything: Ensure your Matterport camera battery is fully charged. Also, make sure the controlling device (iPad or compatible smartphone) is adequately charged.
- Install the Matterport Capture App: Download and install the latest version of the Matterport Capture app onto your compatible iOS or Android device.
- Stable Tripod: A sturdy tripod is crucial for sharp, clear scans. Ensure it's in good working order and can securely hold the camera. Most Matterport cameras use a standard 3/8"-16 tripod mount or come with a quick-release plate.
- Sufficient Device Storage: 3D scans generate a lot of data. Make sure your controlling device has enough free storage space for the planned project.
- Prepare the Space:
- Declutter: Remove any unnecessary items or personal effects to ensure a clean, professional look.
- Lighting: Ensure consistent lighting. Open blinds or turn on lights as needed. Avoid direct sunlight shining into the lens.
- Access: Plan your scanning path and ensure all areas you intend to capture are accessible.
From LiDAR to integrated cloud platforms, today’s 3D scanning tools deliver unprecedented levels of accuracy. Our 3D Scanning Services leverage state-of-the-art hardware like the Leica RTC360 and Matterport Pro3 to give you precise, high-density point clouds tailored to your project.
Step-by-Step Matterport Camera Setup 🚀
Once your preparations are complete, follow these steps to set up your Matterport camera:
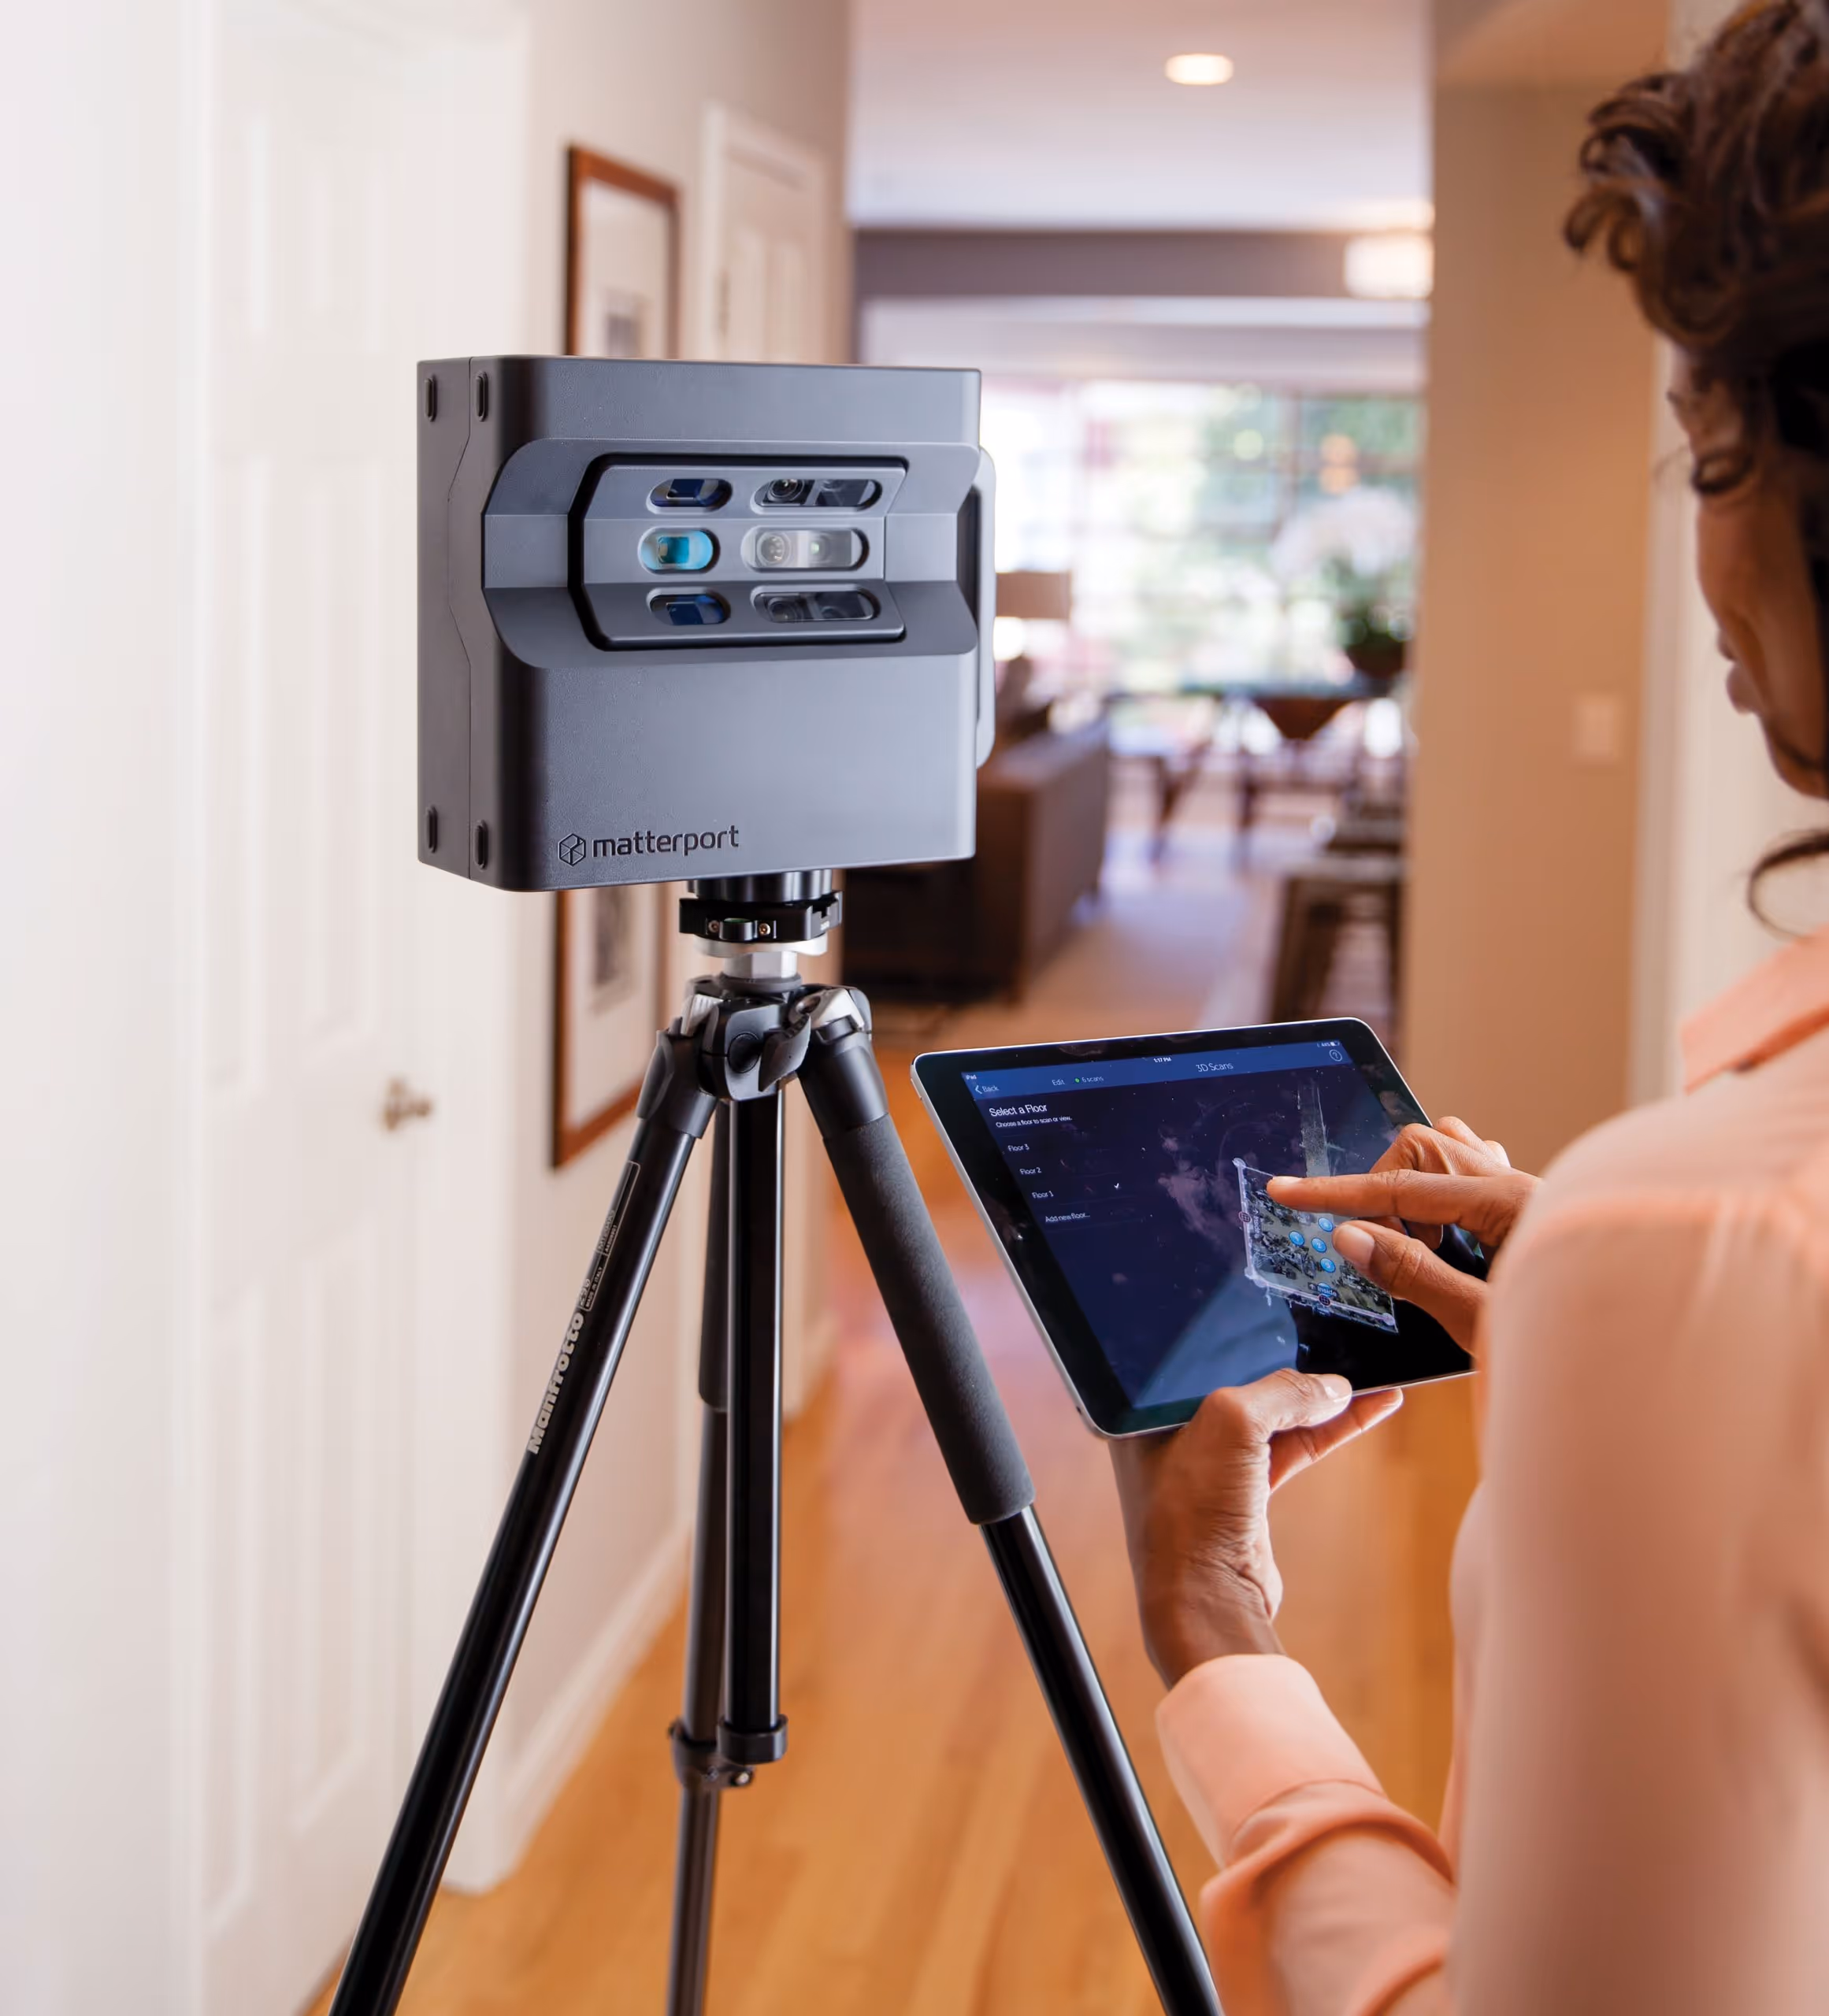
- Mount the Camera Securely:
- Attach the Matterport camera to your tripod. Ensure it's tightened and stable. The camera should be level.
- Position the tripod for your first scan, typically near the entrance or a central point of the first area.
- Power On the Camera:
- Press the power button on the Matterport camera. Wait for it to initialize, which may take a minute or two. You'll usually see status lights indicating it's ready.
- Connect Your Device to the Camera's Wi-Fi:
- On your iPad or smartphone, go to Settings > Wi-Fi.
- Look for the Wi-Fi network broadcast by the Matterport camera (the network name often includes the camera model or serial number).
- Select the network and enter the password if required (this is often found on the camera itself or in its documentation).
- Open the Matterport Capture App:
- Launch the Matterport Capture app on your connected device.
- Sign in to your Matterport Cloud account if prompted.
- You can either start a New Job/Project or open an existing one if you're adding scans.
- Verify Connection and Camera Readiness:
- Once the app is open and connected to the camera's Wi-Fi, it should automatically detect the camera. You'll typically see a camera icon or status message indicating it's connected and ready to scan.
- The app will display the camera's view (on some models) or be ready for the first scan command.
- Initiate Your First Scan:
- Position the tripod with the camera at the desired first scan location (usually about 2.5 feet or 0.75 meters away from walls, and 5-8 feet or 1.5-2.5 meters between scan points).
- In the Matterport Capture app, tap the Scan button.
- The camera will rotate 360 degrees, capturing data. It's crucial that you and any other people remain still and out of the camera's line of sight during the scan.
- Review and Reposition for Subsequent Scans:
- After the scan is complete (usually takes 20-60 seconds depending on the camera model and settings), the app will process the data and add it to your floor plan preview.
- Review the scan in the app to ensure it captured correctly.
- Move the camera to the next scan location, maintaining a line of sight with a previous scan point and appropriate spacing. The app often provides alignment guides.
- Repeat the scan process, moving systematically through the space.
Need intelligent BIM outputs from point clouds? Our Scan to BIM Services use AI-aware modeling workflows to generate accurate Revit models from reality capture data—perfect for design coordination, clash detection, and digital twins.
Tips for Optimal Matterport Scans ✨
- Overlap: Ensure each new scan has a good overlap with previous scans for proper alignment.
- Line of Sight: Always try to maintain a clear line of sight between the current scan position and at least one previous scan.
- Avoid Moving Objects: Ensure nothing in the scene (doors, furniture, people) moves between scans.
- Consistent Environment: Try to maintain consistent lighting. Avoid scanning when light conditions are rapidly changing.
- Systematic Path: Plan your route through the property to ensure complete coverage without excessive or redundant scans.
- Mark Features: Use the tools in the Matterport Capture app to mark windows, mirrors, and trim lines during or after scanning to improve model accuracy.
Get clear, professionally drafted layouts from your scan data. Our Floor Plans Services turn raw spatial information into usable, high-quality floor plans for planning and presentation purposes.
Professional Scanning with Data Capture Service
While setting up a Matterport camera for basic scans can be straightforward, achieving professional-grade, accurate, and comprehensive 3D virtual tours, As-Built Surveys, or Schematic Floor Plans often requires experience, an eye for detail, and mastery of advanced techniques.
At Data Capture Service, we utilize high-end equipment like the Matterport Pro 3 and combine it with our expertise in 3D scanning to deliver exceptional results for your AEC, restoration, or property marketing projects. We handle the entire process, ensuring optimal data capture, processing, and delivery of actionable assets.
Ready for a flawless 3D virtual tour or precise as-built documentation?
**Contact Data Capture Service Today! Or call us at 1-833-610-8877 for a consultation.**
Maximize the value of your projects with accurate data, intelligent models, and immersive visual experiences. Data Capture Service delivers end-to-end support to help you plan, design, build, and manage with confidence:
- As-Built Documentation Services
- Scan to BIM Services
- 3D Scanning Services
- Floor Plans Creation Services
- Building Surveys Services
- Virtual Tours Creation Services
Ready to explore in more?
Start here:
.avif)
Comparing Matterport with Other 3D Platforms
How Matterport Enhances Real Estate Listings
Virtual Tours with Matterport: Use Cases by Industry
Prefer to Speak Directly?
Experience precision in every project.